Engine Rear Cover Installation Without Seal in Housing
Tools Required
| • | J 41476 Front and Rear Cover Alignment Tool |
| • | J 41480 Front and Rear Cover Alignment |
- Inspect the rear oil gallery plug for proper installation.
- Install the rear housing gasket (519), rear housing (518), and bolts (517).
- Tighten the bolts finger tight. Do not overtighten.
- Install the J 41480 and bolts.
- Rotate the crankshaft until 2 opposing flywheel bolt holes are parallel to the oil pan surface.
- Install the J 41476 and bolts onto the rear of the crankshaft.
- Tighten the tool mounting bolts until snug. Do not overtighten.
- Tighten the J 41480 tool-to-rear housing bolts evenly to 12 N·m (106 lb in).
- Tighten the rear housing bolts to 30 N·m (22 lb ft).
- Remove the tools.
- Measure the rear housing-to-engine block oil pan surface for flatness.
- If the rear housing-to-engine block oil pan surface alignment is not within specifications, repeat the housing alignment procedure.
- If the correct rear housing-to-engine block alignment at the oil pan surface cannot be obtained, replace the rear housing.
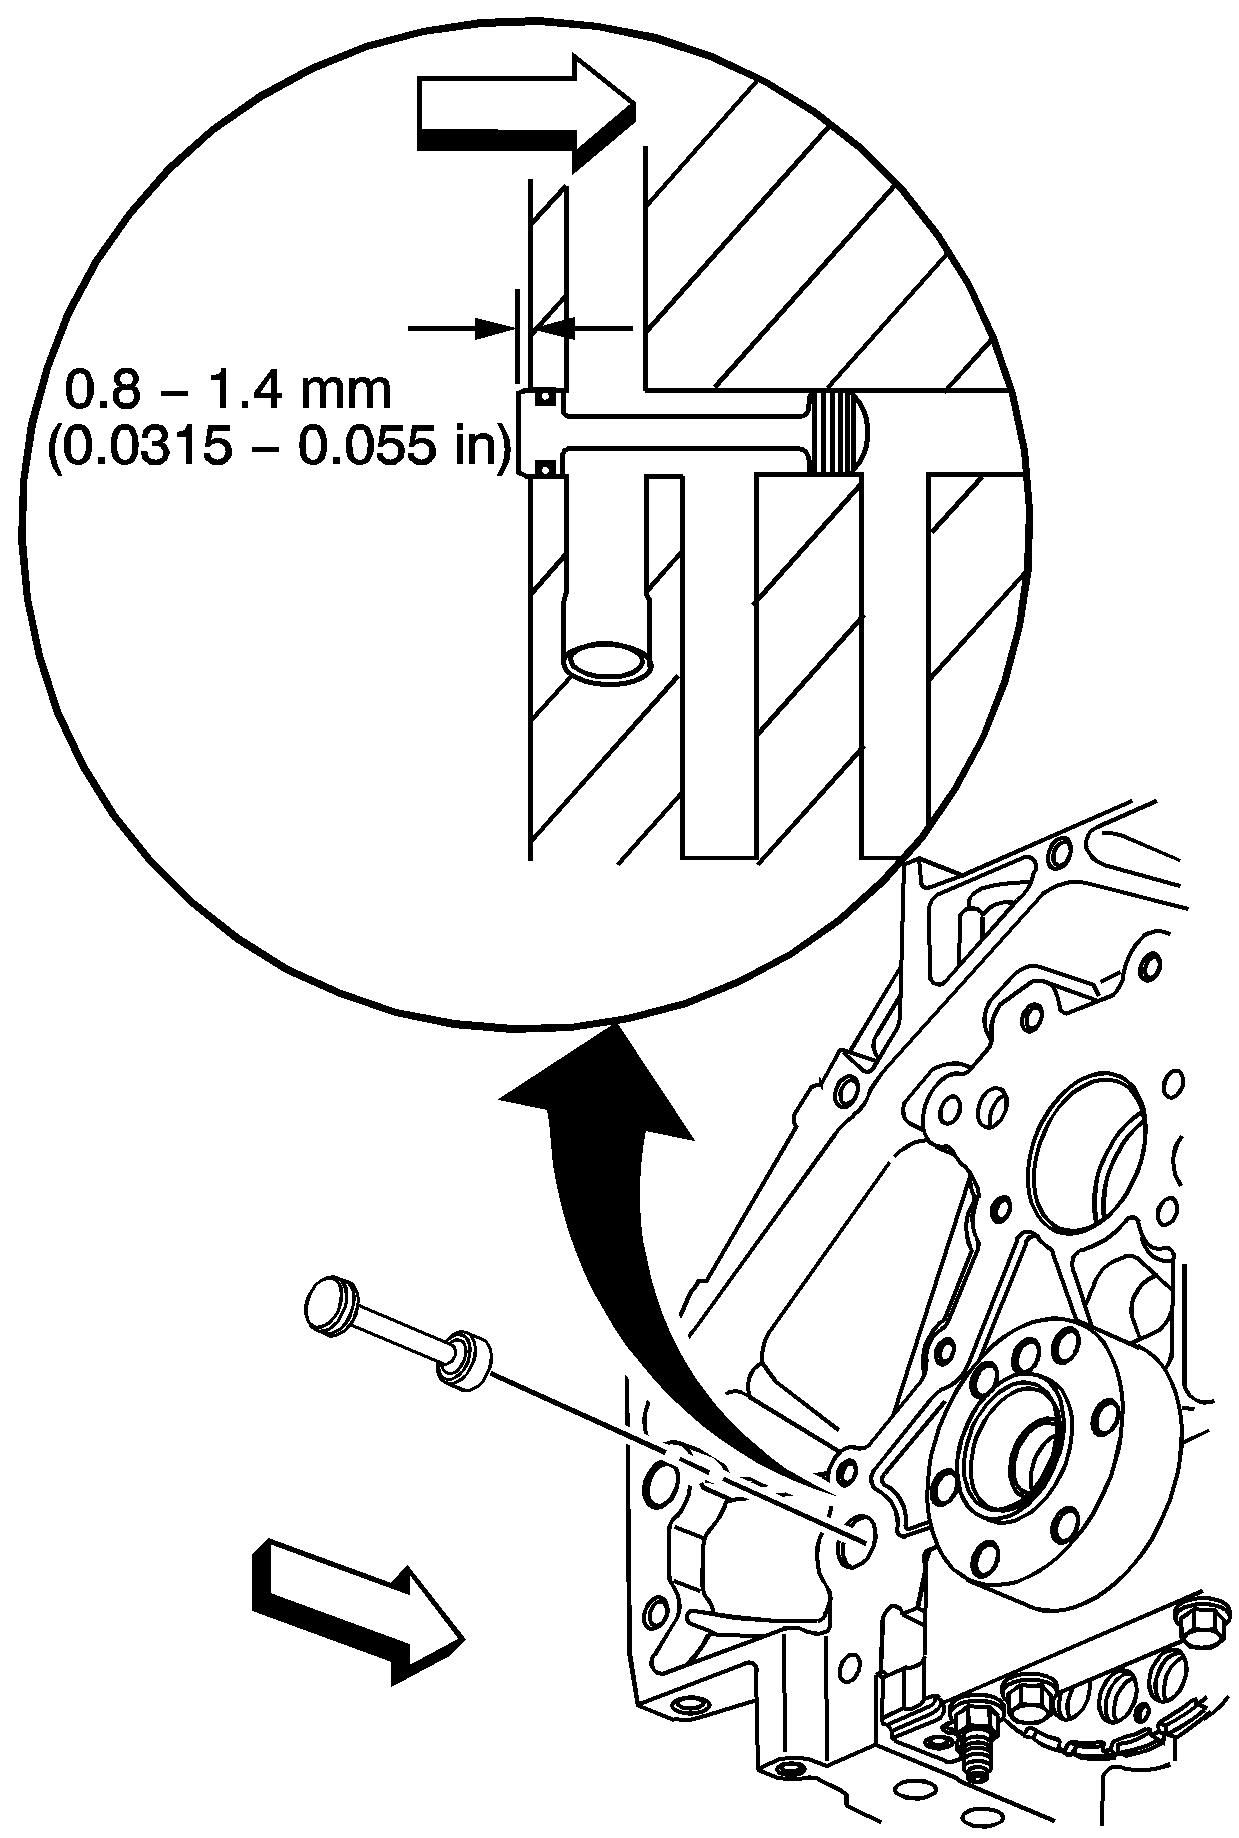
Important:
• Do not use the crankshaft rear oil seal or the engine rear housing gasket again. • Do not apply any type of sealant to the rear housing gasket, unless specified. • The special tools in this procedure are used to properly align the engine rear housing at the oil pan surface and to center the crankshaft rear oil seal. • The crankshaft rear oil seal will be installed after the rear housing has been installed and aligned. Install the rear housing without the crankshaft oil seal. - The crankshaft rear oil seal MUST be centered in relation to the crankshaft. - The oil pan sealing surface at the rear housing, and the engine block, MUST be aligned within specifications. - An improperly aligned rear housing may cause premature rear oil seal wear and/or engine assembly oil leaks.
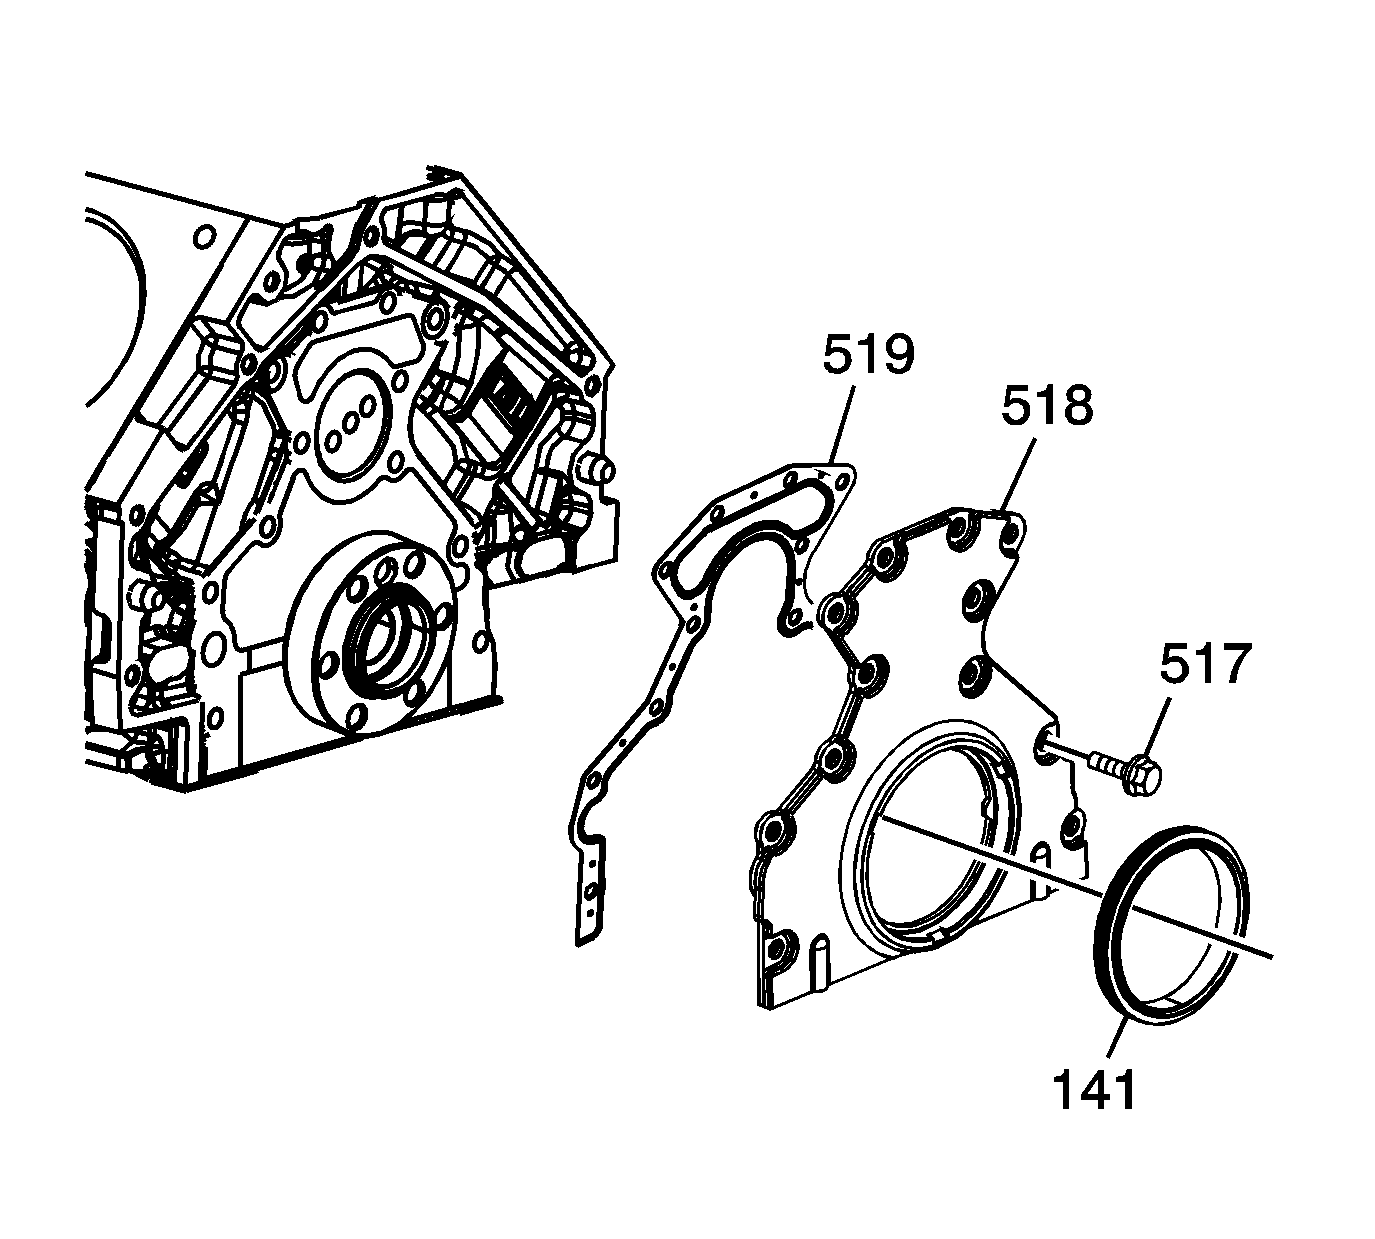
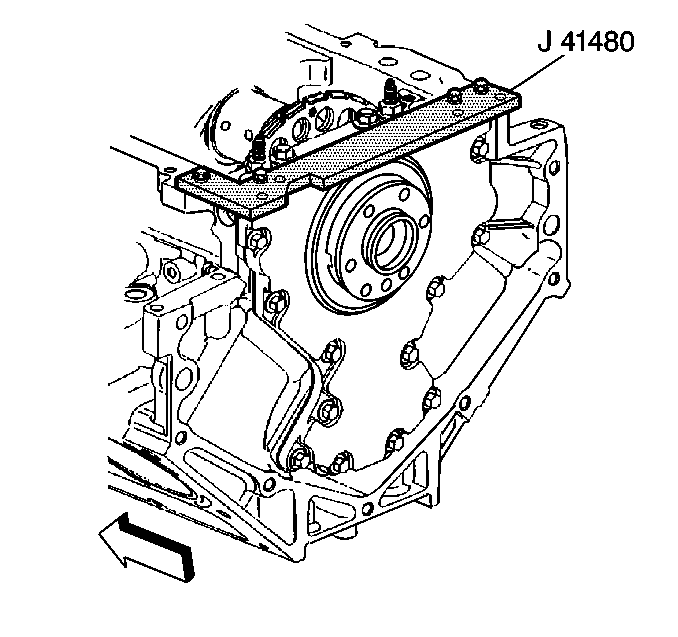
Notice: Use the correct fastener in the correct location. Replacement fasteners must be the correct part number for that application. Fasteners requiring replacement or fasteners requiring the use of thread locking compound or sealant are identified in the service procedure. Do not use paints, lubricants, or corrosion inhibitors on fasteners or fastener joint surfaces unless specified. These coatings affect fastener torque and joint clamping force and may damage the fastener. Use the correct tightening sequence and specifications when installing fasteners in order to avoid damage to parts and systems.
Important: Start the J 41480 tool-to-rear housing bolts. Do not tighten the bolts at this time.
Tighten
Tighten the tool-to-engine block bolts to 25 N·m (18 lb ft).
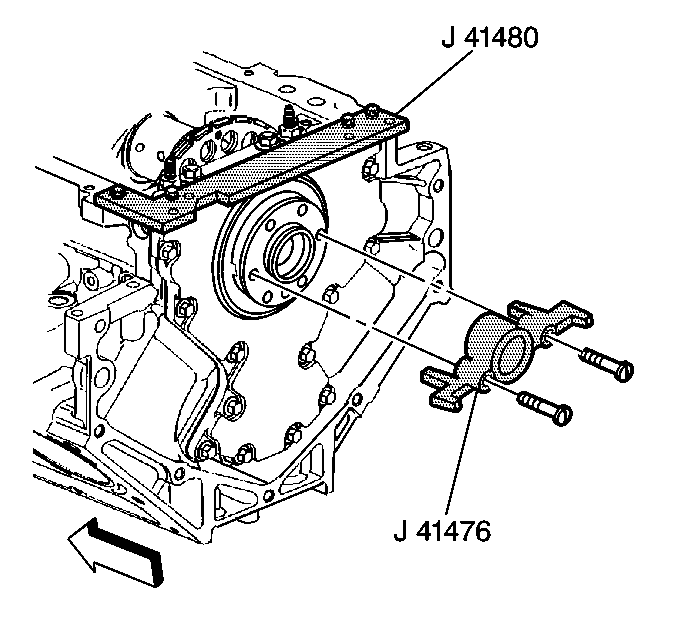
Important: To properly align the rear housing, the J 41476 must be installed onto the rear of the crankshaft with the tool mounting bolts parallel to the oil pan surface.
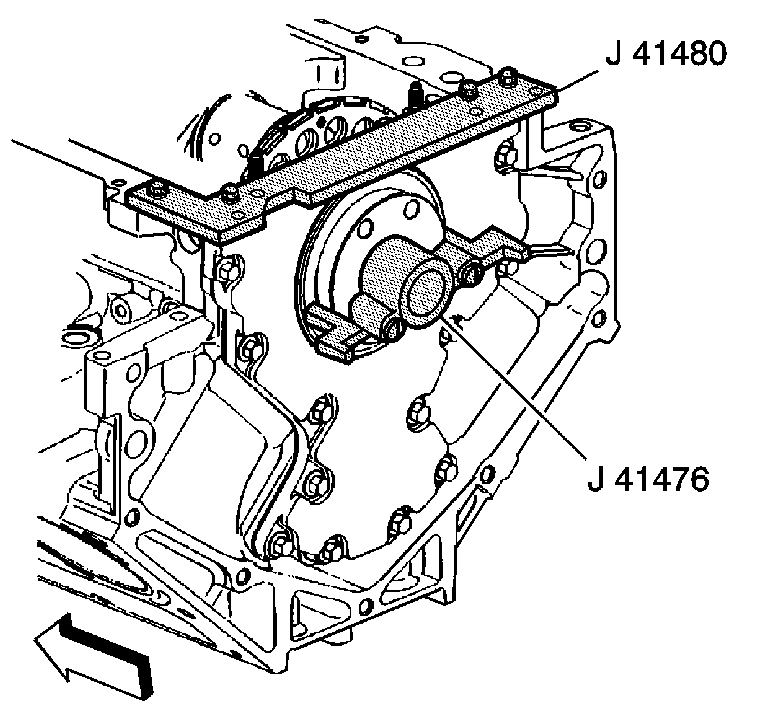
Important: The tapered legs of the alignment tool must enter the rear housing oil seal bore.
Tighten
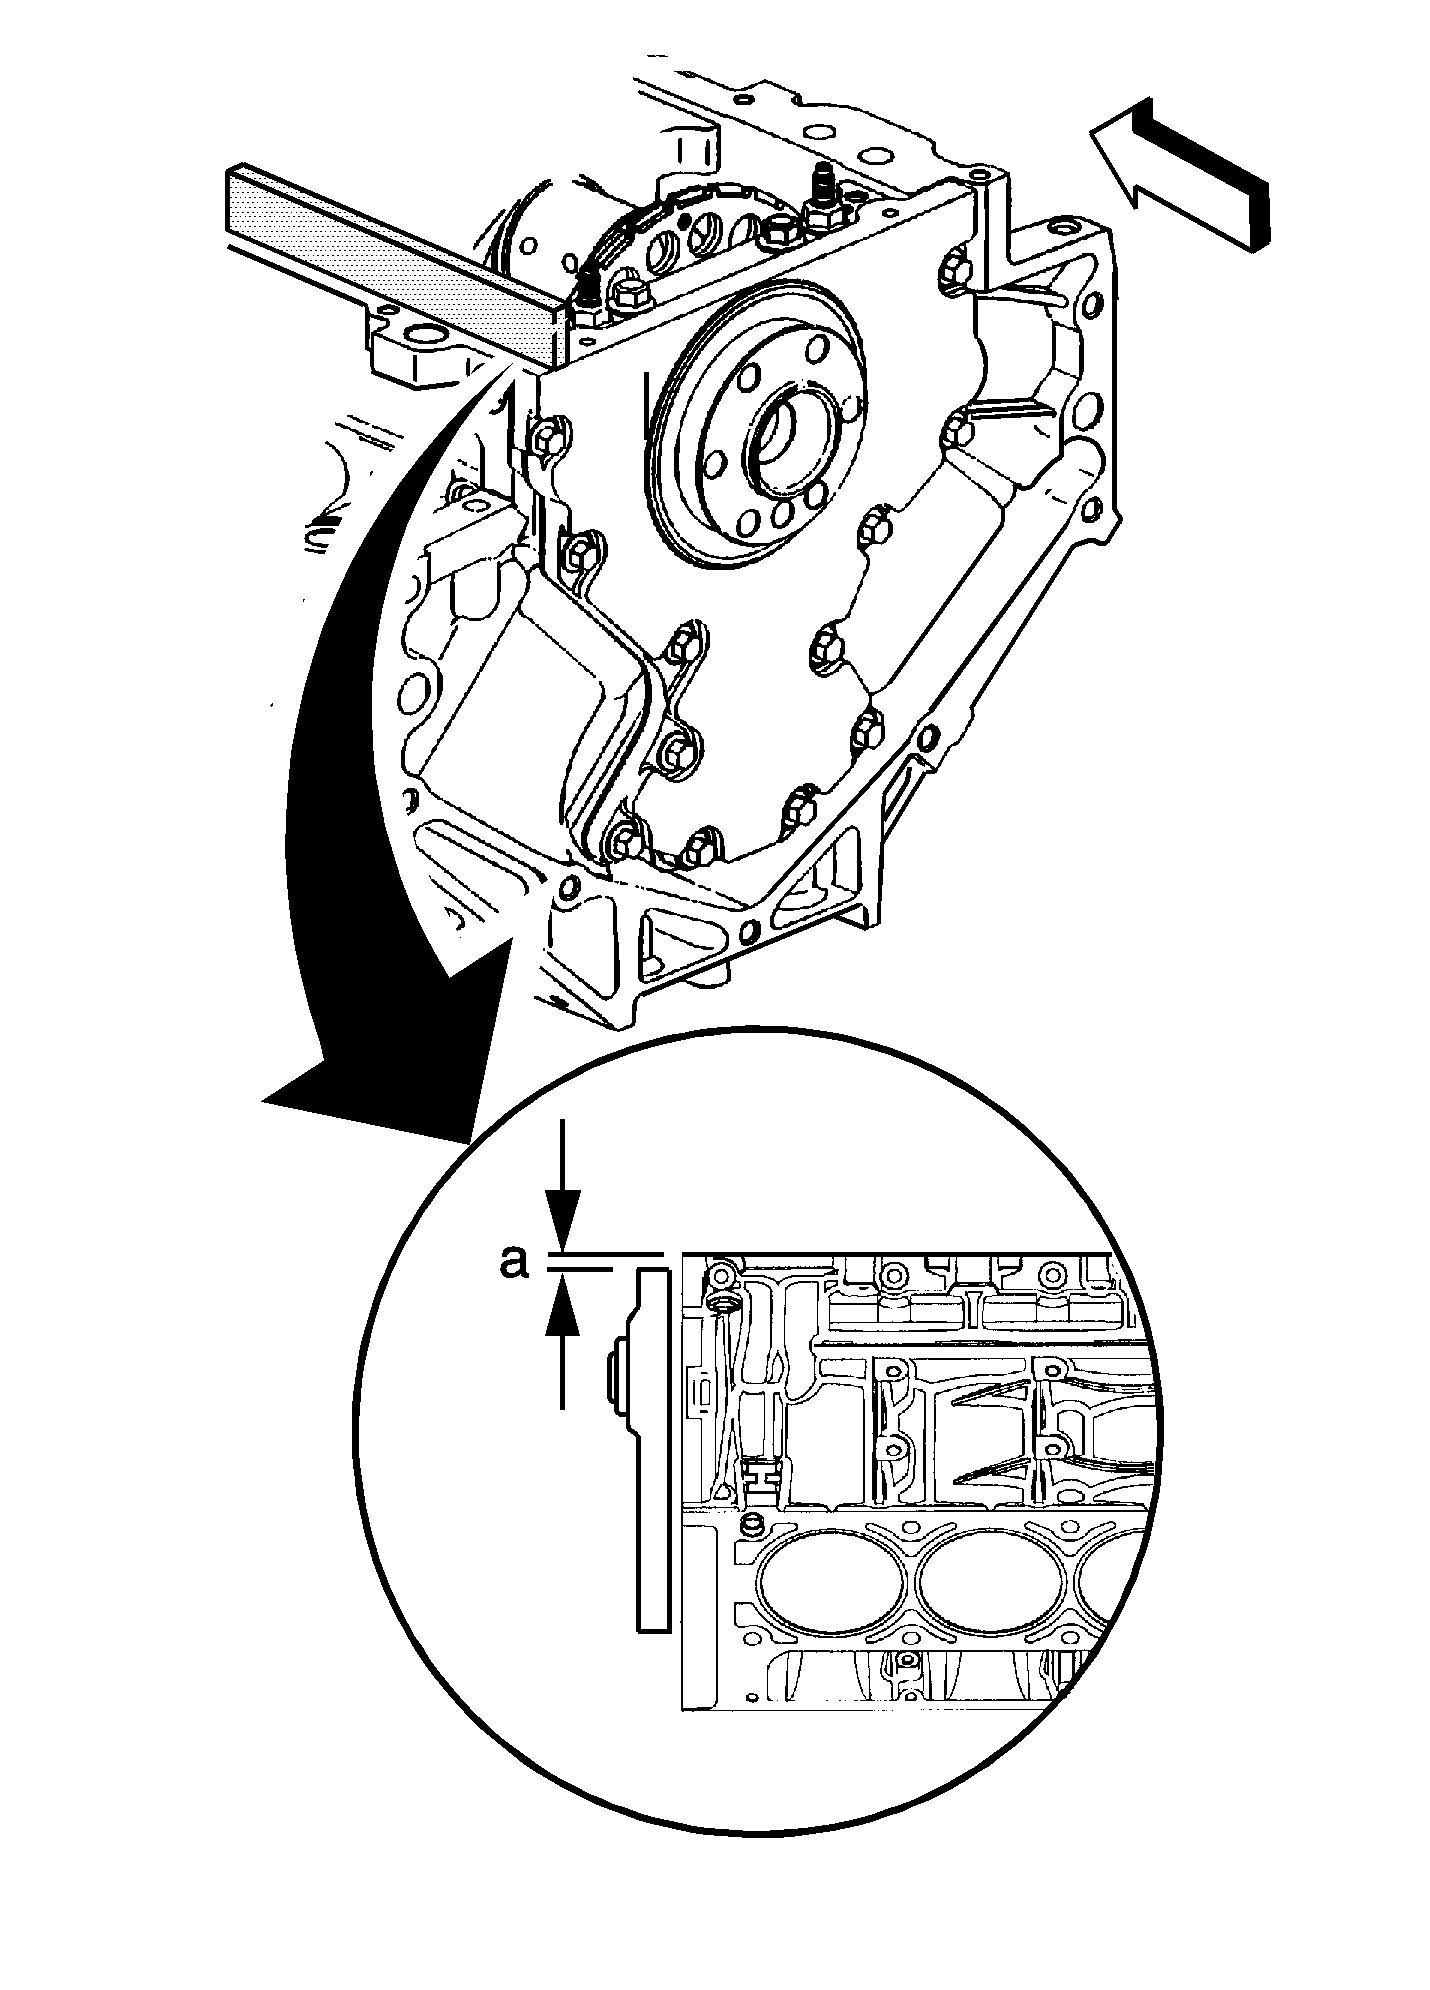
| 8.1. | Place a straight edge onto the engine block and rear housing oil pan sealing surfaces. |
Avoid contact with the portion of the gasket that protrudes into the oil pan surface.
| 8.2. | Insert a feeler gage between the rear housing and the straight edge. The housing must be flush with the oil pan or no greater than 0.5 mm (0.02 in) below flush. |
Engine Rear Cover Installation With Seal in Housing
Tools Required
| • | J 41479-2A Crankshaft Rear Oil Seal Installation Guide |
| • | J 41480 Front and Rear Cover Alignment |
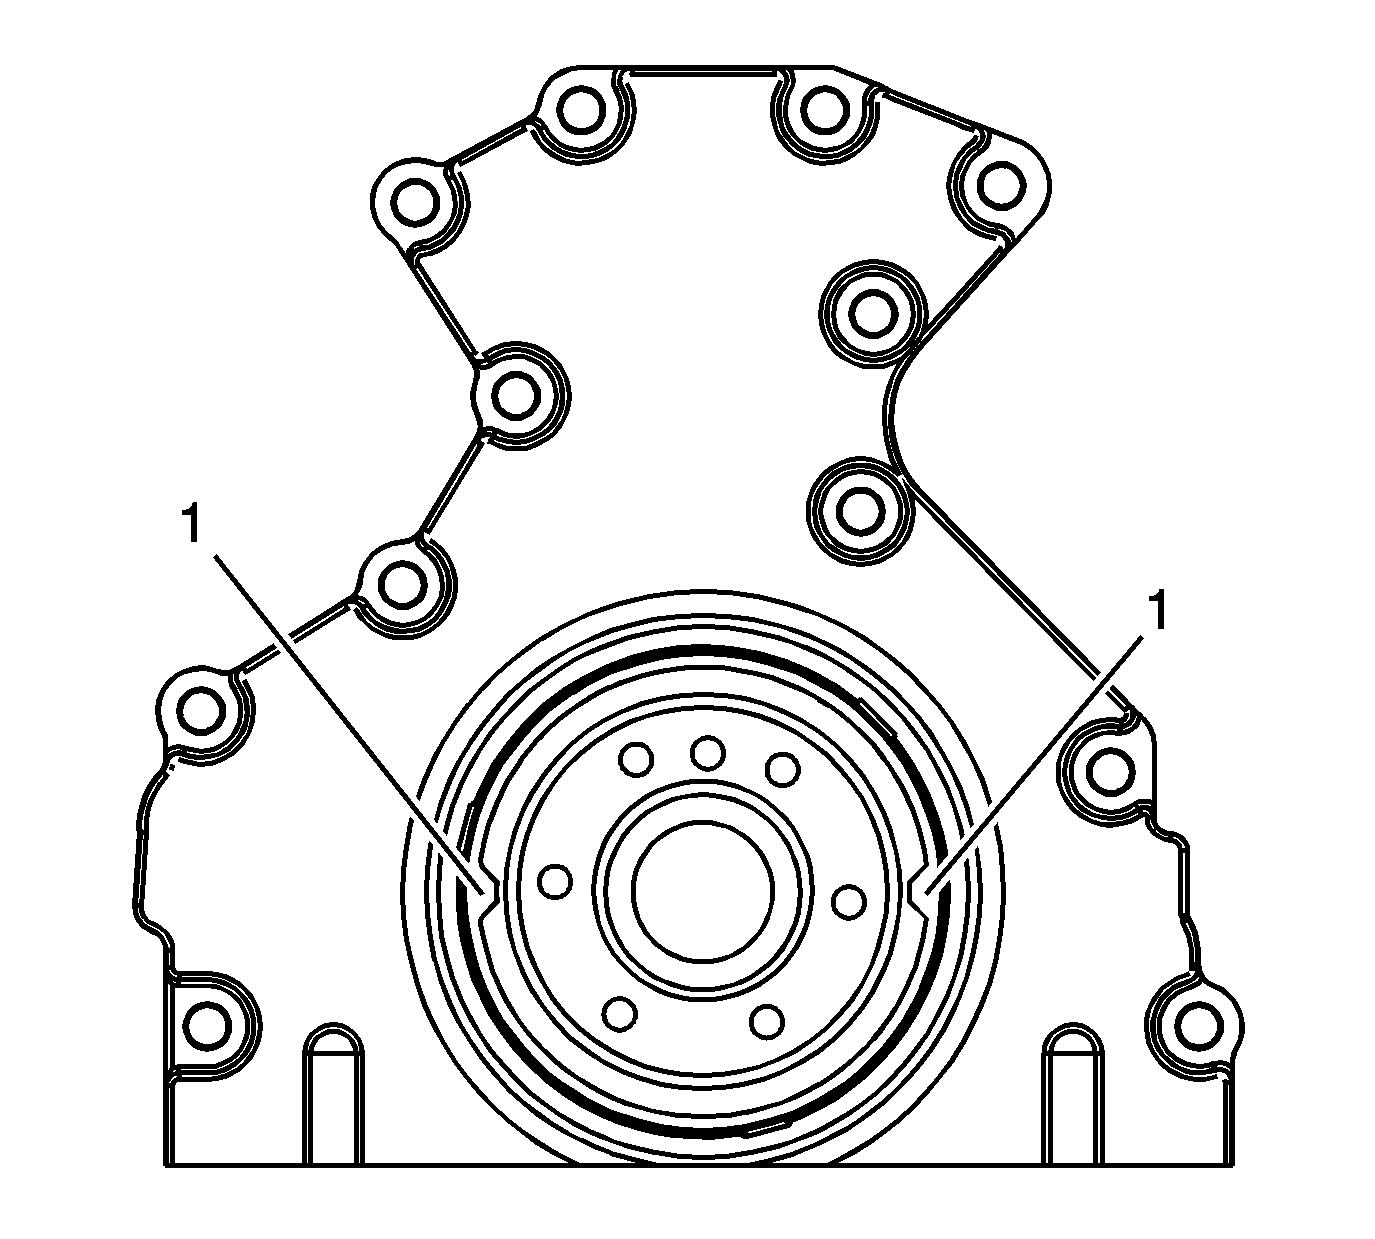
- Inspect the rear housing to identify for alignment tabs (1).
- Inspect the rear oil gallery plug for proper installation.
- Install the J 41479-2A cone and bolts onto the rear of the crankshaft.
- Tighten the bolts until snug. Do not overtighten.
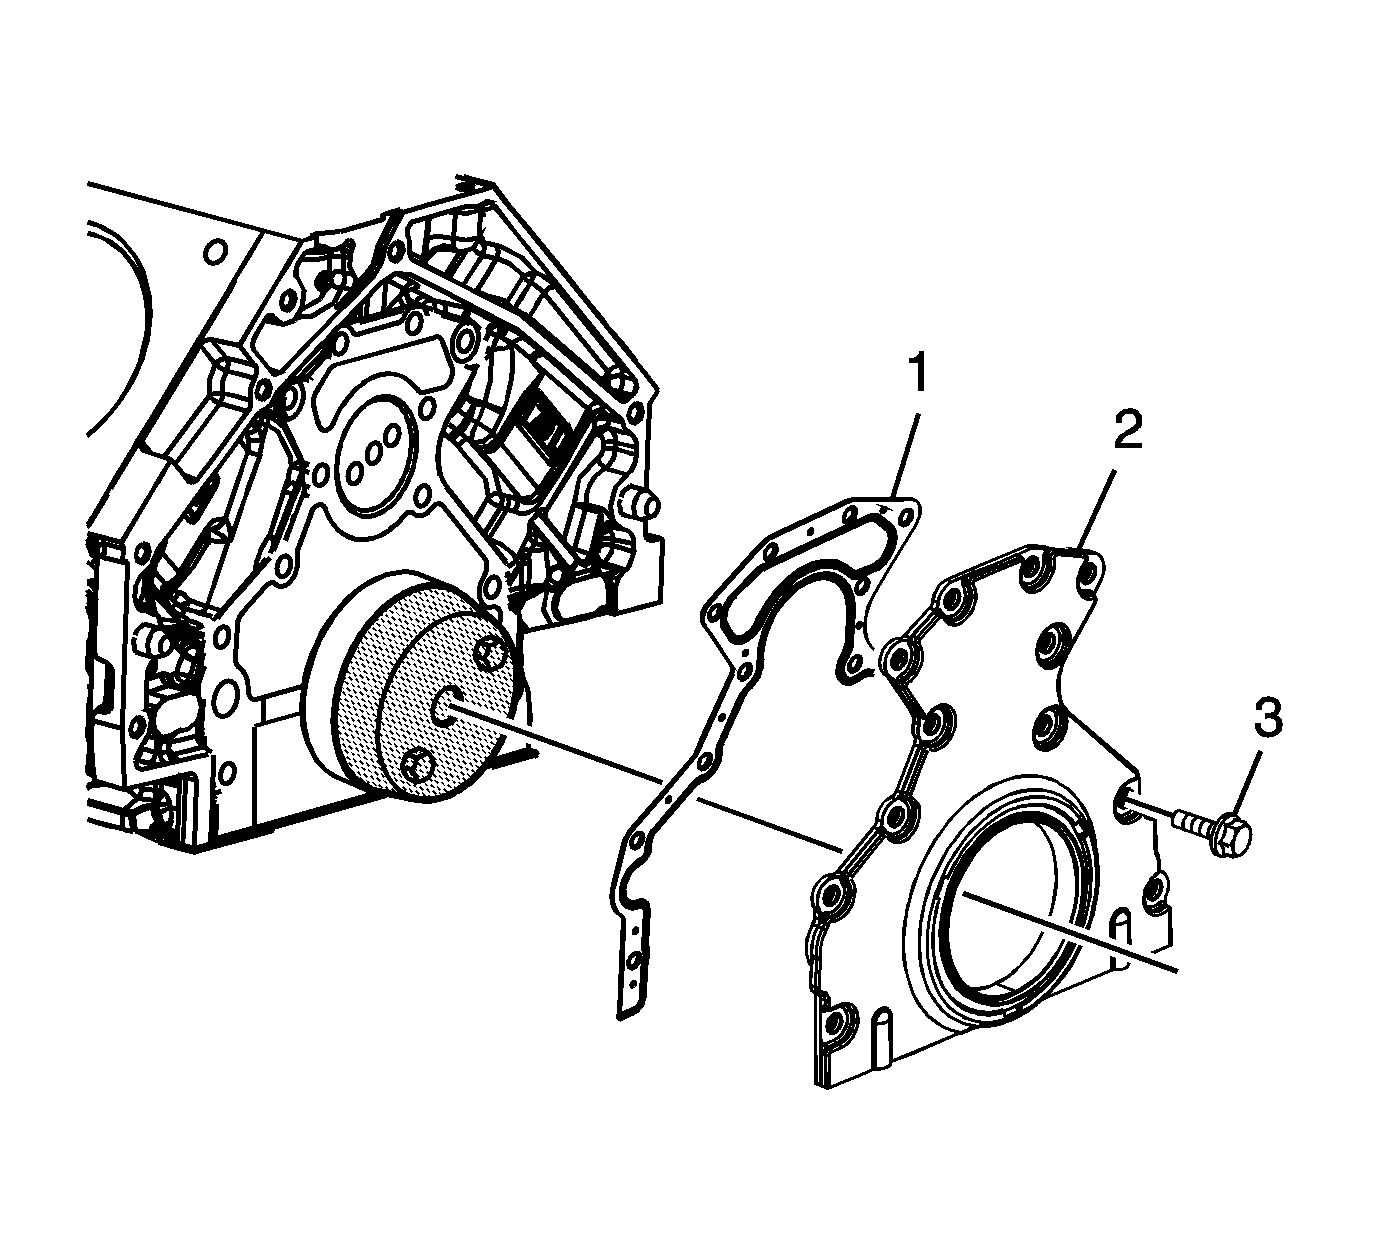
- Install the rear housing gasket (1), rear housing with seal (2), and bolts (3).
- Tighten the bolts finger tight. Do not overtighten.
- Remove the J 41479-2A and bolts.
- Install the J 41480 and bolts.
- Tighten the tool-to-engine block bolts to 25 N·m (18 lb ft).
- Tighten the J 41480 tool-to-rear housing bolts evenly to 12 N·m (106 lb in).
- Tighten the rear housing-to-engine block bolts to 25 N·m (18 lb ft).
- Remove the J 41480 and bolts.
- Measure the rear housing-to-engine block oil pan surface for flatness.
- If the rear housing-to-engine block oil pan surface alignment is not within specifications, repeat the housing alignment procedure.
- If the correct rear housing-to-engine block alignment at the oil pan surface cannot be obtained, replace the rear housing.
Important:
• Do not use the crankshaft rear oil seal or the engine rear housing gasket again. • Do not apply any type of sealant to the rear housing gasket, unless specified. • The special tool in this procedure is used to properly align the engine rear housing at the oil pan surface. • First design rear housings do not have alignment tabs for alignment of the housing horizontally.
J 41476 is required to properly align first design rear housings. The rear oil seal must be removed from the housing
for proper use of the tool. • Second design rear housings have alignment tabs for alignment of the housing horizontally.
J 41476 is not required for proper alignment of second design rear housings. The housing may be installed and aligned
with the seal already installed into the housing.


Notice: Use the correct fastener in the correct location. Replacement fasteners must be the correct part number for that application. Fasteners requiring replacement or fasteners requiring the use of thread locking compound or sealant are identified in the service procedure. Do not use paints, lubricants, or corrosion inhibitors on fasteners or fastener joint surfaces unless specified. These coatings affect fastener torque and joint clamping force and may damage the fastener. Use the correct tightening sequence and specifications when installing fasteners in order to avoid damage to parts and systems.
Tighten

| 10.1. | Place a straight edge onto the engine block and rear housing oil pan sealing surfaces. |
Avoid contact with the portion of the gasket that protrudes into the oil pan surface.
| 10.2. | Insert a feeler gage between the rear housing and the straight edge. The housing must be flush with the oil pan or no greater than 0.5 mm (0.02 in) below flush. |